This tip may save you a tow. This thread only applies to HWH automatic leveling systems. This trick was illustrated in my Country Coach manual, but took a while to determine it works with the Newell HWH leveling systems.
If when traveling you lose a ride height control valve your system will give you a red light, low air pressure warning, on your touch pad. That corner of your coach will be very low. By pulling the "Travel" fuse you can override your system. Once you pull the 7.5 amp "travel" fuse you can adjust your ride height back to travel height by turning on your touch pad and using the appropriate up buttons. Once adjusted to ride height you can move the coach at speed and it will stay at ride height. When I had a ride height valve fail in Syracuse, NY I was able to drive home(1200 miles) and replace the ride height valve in my shop. If you go to a campground and want to level your automatic leveling system will level the coach. Prior to moving in the morning just put your coach back to ride height using the touch pad up buttons. TIP: Make a measurement of the center of each wheel well height after your coach is aired up and in travel mode. Keep these measurements in the coach and if ever needed it will be easier to adjust your coach back to ride height.
The 7.5 amp "travel" fuse is located inside your HWH control box. There are no other 7.5 amp fuses in the HWH control box other than the "travel" fuse. Different control boxes come in different sizes and layouts, so you'll have to find where your "travel" fuse is located. My HWH system is a series 680. If you have this system I have enclosed three photos to help you locate the "travel" fuse. While other systems may be slightly different the concept is the same.
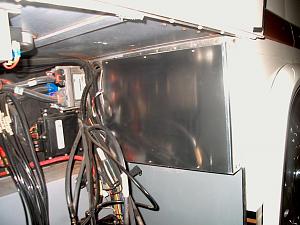
Photo #1-shows the closed up HWH control box mounted to the rear wall of the first compartment on the left side of coach. Six phillips head screws to remove the cover.
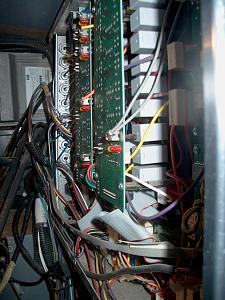
Photo #2-shows the HWH control box with the cover removed and the circuit boards visible.
Photo #3-shows a side shot of the "travel fuse(it is located next to the front of the third white box from the bottom) The fuse is plugged into the rear of the circuit board and to remove it you must loosen the board. You will see a spacer by the bottom white box that the front circuit board screws into. There is a screw & spacer at all four corners. Remove the four phillips head screws and you can turn the board toward yourself, remove the "travel" fuse and reattach the circuit board. The travel fuse is the only fuse on the back of this circuit board.
I hope this is helpful......................


 Linear Mode


